
SAML SSO Guide
SAML SSO is a feature of Raisely Pro.
If your organisation uses an Identity Provider (IdP) for user authentication, you can configure Raisely to allow your users to log in using their IdP credentials.
Raisely offers single sign on using the SAML SSO standard. SAML provides authentication and authorisation services, by passing information between an IdP and a Service Provider. Raisely acts as a Service Provider in this instance.
SAML SSO can be used for login to the Raisely Admin panel, as well as sign up and login to Raisely campaign websites. Once the SAML SSO connection is configured, Raisely will automatically create and update users that login via your IdP.
Skip Ahead To
Set Up User Roles and Attributes
Understand SAML SSO and Raisely
Configure SAML SSO on Microsoft Entra ID
Use SAML SSO on Campaign Websites
Configure SAML SSO
You must have an Identity Provider (IdP) to offer SAML SSO to your users.
1. Create a new SAML Client on your IdP
Use the following settings to establish the connection to Raisely:
| Setting | Value |
| ACS (Consumer) URL & Validator | https://api.raisely.com/v3/saml/callback |
| Login URL | https://api.raisely.com/v3/saml/login |
| Single Logout URL | https://api.raisely.com/v3/saml/logout |
| SAML initiator | Service provider (we do not support IdP initiated login) |
| SAML nameID format | |
| Signature and Digest Algorithm | SHA-256 |
2. Provide Raisely with your IdP details
Once you have configured your new SAML client, you will need to securely provide Raisely with details of your IdP configuration. Please note that these values must be provided directly to Raisely Support during setup and cannot be updated without Raisely support.
| Setting | Description |
| Your domain identifier | For Raisely admin users, we match your organisation's domain against a user's email address to trigger the SAML SSO login flow (eg. raisely.com) |
| Issuer details | Your IdP client will have a unique issuer value (usually a URL) that we use to verify our SAML SSO connection |
| Single Sign On (SSO) Endpoint | This is the SSO entry point URL for IdP login. |
| Single Logout Endpoint (SLO) | This is the SLO entry point URL for IdP log out (optional). |
3. Finalise your setup, or adjust for future use
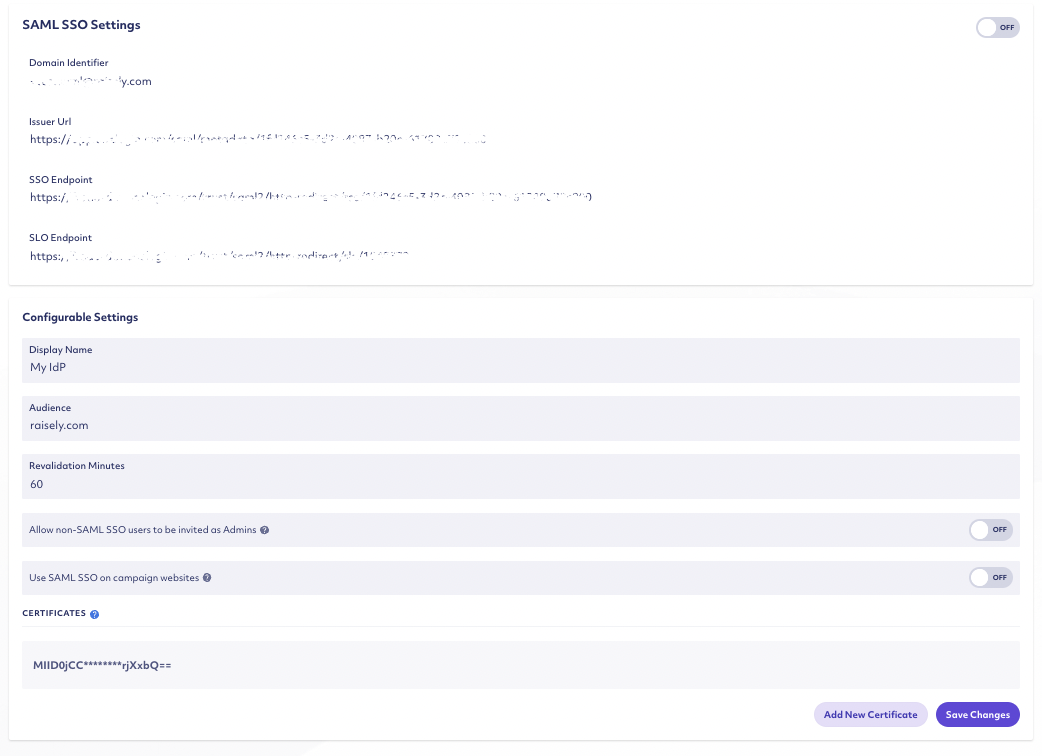
To complete the setup, your organisation will also need to finalise additional settings. Once the above values have been added by Raisely support, the following settings are directly configurable in the Raisely Admin panel.
| Setting | Description | Notes |
| Audience | The IdP audience, often a URL. | Required |
| Certificate/s | You can provide up to two certificates which allows for certificate roll overs. | Required |
| Allow non-SAML SSO users to be invited as Admins | When switched on, you can invite non-SAML SSO users to be a team member of your organisation and they can access Raisely via username and password. | Default is off. |
| Use SAML SSO on campaign websites | If selected, all campaigns created in the future will have SAML SSO automatically switched on for sign up and login. | Default is off. |
| Revalidation Minutes | How often (in minutes) a SSO Admin user will have their roles and access revalidated. | Default is 60 minutes. |
| Display Name | What you would like users to see when redirected to your IdP. | Not required. |
SAML SSO settings in the Raisely Admin
- 1
- From the bottom of the sidebar, select Organisation > SAML SSO
- 2
- Adjust the settings as needed
- 3
- Select Save Changes to finish
- 4
- When you are ready to switch on SAML SSO, enable the feature by toggling ON
Set Up User Roles and Attributes
Access to Raisely Admin is managed by user roles. Raisely expects that organisations will manage these roles in their Identity Provider.
To understand Raisely roles and permissions, please see our support article on Managing Team Members & Permissions
For each user that requires access to the Raisely Admin, use your IdP's attribute mapping tool to pass the following:
| Attribute | Description |
| raiselyRoles | A string of valid roles separated by ';'
eg ORG_ADMIN or CAMPAIGN_ADMIN;FINANCE |
| raiselyCampaignAssignments | To assign all campaigns, you can add the following between ';':
all_campaigns
For campaign specific roles, you can provide a string of allowed campaign paths separated by `;` eg my-first-campaign;fundraising-run |
🟢 Toggle for the full list of Raisely roles and their correct formatting.
| Permission Name | SAML SSO Format | |
| Organisation Admin | ORG_ADMIN | |
| Campaign Admin | CAMPAIGN_ADMIN | |
| Manage Profiles | PROFILE_EDITOR | |
| Manage Donations | DONATION_EDITOR | |
| Manage Tickets | TICKET_COORDINATOR | |
| Manage Regular Donations | SUBSCRIPTION_EDITOR | |
| Manage Pages | PAGE_EDITOR
|
|
| Edit HTML/CSS | TEMPLATE_EDITOR | |
| Manage Blog Posts | POST_EDITOR | |
| Manage Users | DATA_ADMIN | |
| Manage Finance | FINANCE | |
| Manage Messages | COMMS_EDITOR | |
| Manage Campaign Settings | CAMPAIGN_SETTINGS | |
| Download Custom Organisation Reports | ORG_REPORT_VIEWER | |
| Download Campaign Reports | CAMPAIGN_REPORT_VIEWER | |
| Download Bank Payouts | BANK_REPORT_VIEWER | |
| Manage One time and Regular Donations | GIVING_COORDINATOR |
Additional User Attributes
You can also map user name attributes. Raisely accepts the following attributes:
- firstName
- lastName
- preferredName
- fullName
Understanding SAML SSO and Raisely
- Once you have configured your IdP to work with Raisely's SAML SSO setup, you still have control over turning the feature on or off.
- Switching SAML SSO on: Once enabled, all users for your domain identifier must log into the Raisely Admin login via SAML SSO.
- Switching SAML SSO off: If SAML SSO has already been active for your organisation, switching off the feature may affect your user's experience. Admin SAML SSO users will be forced to reset account passwords so that they can log in. If you are a SAML SSO user, please note that your session will be cancelled, and you will be required to log into Raisely Admin. If you have campaign websites with existing SAML SSO users, these users will also have to reset account passwords to access their accounts. Please be aware that if SAML SSO is switched off, users that reset their passwords will retain their roles that were set when they last accessed Raisely. If required, you should remove any old admin members directly in the Raisely Team Settings.
- Raisely requires strong passwords for logging into the Raisely Admin. When users access the Raisely Admin via SAML SSO, we rely on your organisation to implement best practices in authentication to minimise unauthorised access to your Raisely account.
- Users who access Raisely Admin via SAML SSO will not have the option to turn on 2FA.
- SAML SSO users will have sessions created on Raisely that align to their current IdP session. When the session is close to expiring, Raisely will prompt the user to reauthenticate via the IdP.
- Raisely will periodically revalidate a user's role and access to Raisely Admin (the frequency can be configured by the "Revalidation Minutes" in the SAML SSO organisation settings).
- Although user's roles are controlled by the IdP settings, organisation Admins still have the option of deleting SAML SSO Admin users from their Raisely team via the Team Settings. Please note that if a user is still assigned roles in the IdP and logins into the Raisely admin, their roles will be reinstated.
Configure SAML SSO on Microsoft Entra ID
If you have chosen Microsoft Entra ID as your IdP, you can use the following tips to guide your setup.
1. Basic SAML configuration
Within the SAML application in Entra, you will need to set a value for your Identifier (Entity ID). Within Raisely, we expect that our audience value matches this Identifier value. You can use any value, e.g raiselysso , so long as it is unique across all applications in your Microsoft Entra tenant.
This audience value should be set as your Identifier (Entity ID) by going to Enterprise Application-> Single SignON -> Basic SAML Configuration.
The screenshot demonstrates how this should look:

2. Attributes & Claims
There are some key attributes you will need to pay attention to in this section. You can refer to the full list of attributes to see the other attributes that we support.
| Section | Attribute | Notes | |
| Required claim
|
Unique User Identifier (Name ID)
|
This must be mapped to user.email
|
|
| Additional claims
|
raiselyRoles | This can be any custom field that represents your user roles.
|
Note: It is important that you clear any namespace value added to the raiselyRoles or raiselyCampaignAssignments attributes, as indicated in the screenshot below:

3. SAML Certificates
| Setting | Value |
| Signing Option
|
Sign SAML response and assertion |
| Signing Algorithm
|
SHA-256 |
The screenshot demonstrates where these values are set.

4. Set up Raisely
When you are ready, you will need to send us some details to establish the connection to Raisely. In this section we have highlighted some settings that are specific to Microsoft Entra ID. You can refer to the full list of settings to see what else is required.
| Setting | Format
|
Notes |
| Issuer detail | https://sts.windows.net/<tenantid>/ |
Can be found under Enterprise Application -> Single SignON -> Set up <application name> -> Microsoft Entra Identifier |
| Audience | a string | Can be found under Enterprise Application-> Single SignON -> Basic SAML Configuration -> Identifier (Entity ID) |
| Single Sign On (SSO) logon endpoint | https://login.microsoftonline.com/<uuid>/saml2 |
Can be found under Enterprise Application-> Single SignON -> Set up <application name> -> Login URL |
| Single Sign On (SSO) signout endpoint | https://login.microsoftonline.com/<uuid>/saml2 |
Can be found under Enterprise Application-> Single SignON -> Set up <application name> -> Logout URL |
Use SAML SSO on Campaign Websites
Once you have SAML SSO configured and enabled on your organisation account, you can toggle on the Use SAML SSO on Campaign Websites option in Organisation Settings > SAML SSO > Configurable Settings:

Once this toggle is enabled, any new campaigns created while this toggle is on will allow SAML SSO on campaign websites, such as fundraiser log in for example.
Cannot find the support guide you are after? Head on over to our YouTube channel 📺 for more creative content to help you go further. You can even leave us comments, suggesting new content ideas 🤯